爬虫-Scrapy
Scrapy初认识
-
Scrapy是什么?
-
安装
1
pip install scrapy
安装错误(error: Microsoft Visual C++ 14.0 is required)解决:下载 Twisted 对应版本的whl文件(如:Twisted-20.3.0-cp38-cp38-win_amd64.whl),cp后面是python版本,amd64代表64位,运行命令:
pip install Twisted-20.3.0-cp38-cp38-win_amd64.whl安装 Twisted ,然后再安装scrapy即可!
-
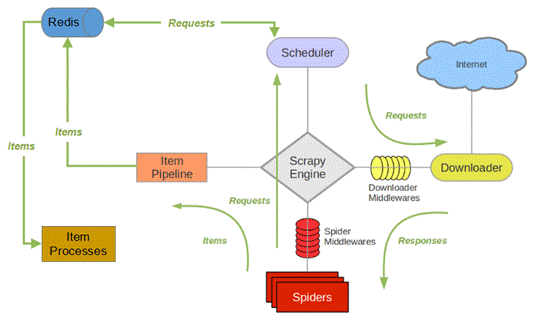
框架的介绍
- 框架有5部分组成
引擎、下载器、spiders、调度器(schedule)、管道(pipeline) - 我们的代码写到spiders、管道中,spiders里面我们要实现文件内容解析,链接提取;管道:数据是保存到文件中、mysql中、MongoDB中?
- 框架有5部分组成
-
工作原理:
- 引擎从调度器中取出一个链接(URL)用于接下来的抓取
- 引擎把URL封装成一个请求(Request)传给下载器
- 下载器把资源下载下来,并封装成应答包(Response)
- 爬虫解析Response
- 解析出实体(Item),则交给实体管道进行进一步的处理
- 解析出的是链接(URL),则把URL交给调度器等待抓取
-
简单使用
-
创建项目
1
scrapy startproject firstblood
-
认识目录结构
1
2
3
4
5
6
7
8
9
10
11
12
13
firstblood
firstblood 真正的项目文件
__pycache__ 缓存文件
spiders 爬虫文件存放的地方
__pycache__ 缓存文件
__init__.py 包的标志
qiubai.py 爬虫文件(*)
__init__.py 包的标志
items.py 定义数据结构的地方(*)
middlewares.py 中间件
pipelines.py 管道文件(*)
settings.py 配置文件(*)
scrapy.cfg 不用管*表示需要经常打交道的文件
-
生成爬虫文件
1
2
3
4
5
6
7
8
cd firstblood
scrapy genspider qiubai www.qiushibaike.com
# qiubai.py 参数介绍
name 爬虫的名字
allowed_domains 允许的域名,是一个列表,里边可以放多个,一般都做限制
start_urls 起始url,是一个列表
parse(self,response) 解析函数parse(self, response)解析函数,重写这个方法,发送请求之后,响应来了就会调用这个方法,函数有一个参数response就是响应的内容,该函数对返回值有一个要求:必须返回可迭代对象 -
认识
response对象- 程序跑起来:
1
2
cd firstblood/firstblood/spiders
scrapy crawl qiubai问题1:pywin32安装一下,注意版本
问题2:在settings.py中取消遵从robots协议
问题3:在settings.py中修改UA头部信息1
2
3
4
5# Crawl responsibly by identifying yourself (and your website) on the user-agent
USER_AGENT = 'Mozilla/5.0 (Windows NT 10.0; Win64; x64) AppleWebKit/537.36 (KHTML, like Gecko) Chrome/79.0.3945.88 Safari/537.36'
# Obey robots.txt rules
ROBOTSTXT_OBEY = False - response的常用方法和属性
1
2
3
4
5属性:
text 以字符串类型查看响应
body 以字节类型查看响应
方法:
xpath() scrapy内部已经集成了xpath,直接使用即可,此xpath非彼xpath,略有不同
- 程序跑起来:
-
执行输出指定格式
1
2
3scrapy crawl qiubai -o qiubai.json
scrapy crawl qiubai -o qiubai.xml
scrapy crawl qiubai -o qiubai.csv【注】你输出为csv的时候,中间估计有空行,自己百度一下解决掉即可
- 示例:
1
2
3
4
5
6
7
8
9
10
11
12
13
14
15
16
17
18
19
20
21
22
23
24
25
26
27
28
29
30
31
32
33
34
35
36# -*- coding: utf-8 -*-
import scrapy
class QiubaiSpider(scrapy.Spider):
# 爬虫的名字
name = 'qiubai'
# 允许的域名, 是一个列表,里面可以放多个,一般都做限制
allowed_domains = ['www.qiushibaike.com', 'www.baidu.com']
# 起始url,是一个列表
start_urls = ['https://www.qiushibaike.com/']
# 解析函数,重写这个方法,发送请求之后,响应来了就会调用这个方法,函数有一个参数response就是响应内容,该函数对返回值有一个要求,必须返回可迭代对象
def parse(self, response):
print('嘿嘿嘿')
# print(response.text)
# print(response.body)
# print('啦啦啦')
# 首先获取所有的div
div_list = response.xpath('//div[@id="content-left"]/div')
# print(div_list)
# print(len(div_list))
# print('啦啦啦')
items = []
for odiv in div_list:
# 获取头像链接
face = odiv.xpath('.//div[@class="author clearfix"]//img/@src').extract()[0]
# 获取用户名
name = odiv.xpath('.//div[@class="author clearfix"]//h2/text()')[0].extract()
# 存放到字典中
item = {
'头像': face,
'用户名': name
}
items.append(item)
return items
-
scrapy shell
-
scrapy shell是什么?调试工具,常用来调试xpath对不对
-
安装依赖
1
pip install ipython
更加智能的交互环境,可以通过tab键智能提醒
-
终端下任意位置,输入如下指令:
1
scrapy shell url
注意:如果进不去,可以在scrapy项目目录下进入
Scrapy中常用对象
Request对象
-
简介
一个
Request对象代表一个 HTTP 请求,通常在 Spider 中生成并由 Downloader 执行,从而生成一个Response。 -
参数
-
url
- 此请求的 URL,如果 URL 无效,
ValueError则会引发异常。 - 包含此请求的 URL 的字符串。请记住,此属性包含转义的 URL,因此它可能与
__init__方法中传递的 URL 不同。 - 该属性是只读的。要更改请求的 URL,请使用
replace()。
- 此请求的 URL,如果 URL 无效,
-
callback
将使用此请求的响应(一旦下载)作为其第一个参数调用的函数。有关更多信息,请参阅下面的将附加数据传递给回调函数。如果请求未指定回调,则将使用爬虫的
parse()方法。请注意,如果在处理期间引发异常,则会调用 errback。 -
method
- 此请求的 HTTP 方法。默认为
'GET'。 - 表示请求中 HTTP 方法的字符串。这保证是大写的。例如:
"GET","POST","PUT",等。
- 此请求的 HTTP 方法。默认为
-
meta
Request.meta属性的初始值。如果给定,则在此参数中传递的 dict 将被浅复制。- 包含此请求的任意元数据的字典。对于新的请求,这个 dict 是空的,通常由不同的 Scrapy 组件(扩展、中间件等)填充。因此,此 dict 中包含的数据取决于您启用的扩展。
- 有关Scrapy 识别的特殊元键列表,请参阅Request.meta 特殊键。
- 该dict在使用
copy()或replace()方法克隆请求时被浅复制,也可以在爬虫中从响应访问该response.meta属性。
-
body
- 请求正文。如果传递了字符串,则使用
encoding传递的(默认为utf-8)将其编码为字节。如果body未给出,则存储一个空字节对象。无论此参数的类型如何,存储的最终值都将是字节对象(绝不是字符串或None)。 - 请求正文为字节。该属性是只读的。要更改请求的正文,请使用
replace()。
- 请求正文。如果传递了字符串,则使用
-
headers
- 包含请求标头的类似字典的对象。
- 此请求的标头。dict 值可以是字符串(对于单值标题)或列表(对于多值标题)。如果
None作为值传递,则根本不会发送 HTTP 标头。 - 警告:CookiesMiddleware
Cookie不考虑通过标头设置的 Cookie。如果您需要为请求设置 cookie,请使用该Request.cookies参数。这是一个目前已知的限制,正在研究。
-
cookies
- 请求的 cookie。这些可以以两种形式发送。
- 使用字典:
1
2request_with_cookies = Request(url="http://www.example.com",
cookies={'currency': 'USD', 'country': 'UY'}) - 使用字典列表:
1
2
3
4
5request_with_cookies = Request(url="http://www.example.com",
cookies=[{'name': 'currency',
'value': 'USD',
'domain': 'example.com',
'path': '/currency'}])
- 使用字典:
- 后一种形式允许自定义 cookie的
domain和path属性。这仅在为以后的请求保存 cookie 时才有用。 - 当某些站点返回 cookie(在响应中)时,这些 cookie 存储在该域的 cookie 中,并将在以后的请求中再次发送。这是任何常规 Web 浏览器的典型行为。
- 要创建不发送存储的 cookie 和不存储收到的 cookie 的请求,请将
dont_merge_cookies键设置为Trueinrequest.meta。 - 发送手动定义的 cookie 并忽略 cookie 存储的请求示例:
1
2
3
4
5Request(
url="http://www.example.com",
cookies={'currency': 'USD', 'country': 'UY'},
meta={'dont_merge_cookies': True},
) - 有关更多信息,请参阅CookiesMiddleware。
- 警告:CookiesMiddleware
Cookie不考虑通过标头设置的 Cookie。如果您需要为请求设置 cookie,请使用该Request.cookies参数。这是一个目前已知的限制,正在研究。
- 请求的 cookie。这些可以以两种形式发送。
-
encoding
此请求的编码(默认为
'utf-8')。此编码将用于对 URL 进行百分比编码并将正文转换为字节(如果以字符串形式给出)。 -
priority
此请求的优先级(默认为
0)。调度程序使用优先级来定义用于处理请求的顺序。具有更高优先级值的请求将更早执行。允许负值以指示相对较低的优先级。 -
dont_filter
表示该请求不应被调度程序过滤。当您想要多次执行相同的请求时使用它,以忽略重复项过滤器。小心使用它,否则你会陷入爬行循环。默认为
False。 -
errback
- 如果在处理请求时引发任何异常,将调用该函数。这包括因 404 HTTP 错误等而失败的页面。它接收 a
Failure作为第一个参数。有关更多信息,请参阅下面的使用 errbacks 在请求处理中捕获异常。 - *在2.0版本中的改变:*当指定errback参数时,回调参数不再需要。
- 如果在处理请求时引发任何异常,将调用该函数。这包括因 404 HTTP 错误等而失败的页面。它接收 a
-
flags
发送到请求的标志,可用于日志记录或类似目的。
-
cb_kwargs
- 一个带有任意数据的字典,它将作为关键字参数传递给Request的回调函数。
- 包含此请求的任意元数据的字典。它的内容将作为关键字参数传递给Request的回调函数。对于新请求,它是空的,这意味着默认情况下回调只获取一个
Response对象作为参数。 - 该dict在使用
copy()或replace()方法克隆请求时被浅复制,也可以在爬虫中从响应访问该dict.cb_kwargs属性。 - 在处理请求失败的情况下,可以像
failure.request.cb_kwargs在请求的 errback 中一样访问该字典。 - 有关更多信息,请参阅访问 errback 函数中的其他数据。
-
copy()
返回一个新的请求,它是这个请求的副本。另请参阅:将 附加数据传递给回调函数。
-
replace()
返回具有相同成员的 Request 对象,除了那些由指定的关键字参数赋予新值的成员。默认情况下,
Request.cb_kwargs和Request.meta属性是浅复制的(除非新值作为参数给出)。另请参阅将 附加数据传递给回调函数。
-
Response对象
-
简介
一个
Response对象代表一个 HTTP 响应,它通常被下载(由下载器)并提供给Spider进行处理。 -
属性
-
url
- 此响应的 URL。
- 包含响应 URL 的字符串。
- 该属性是只读的。要更改响应的 URL,请使用
replace()。
-
status
- 响应的 HTTP 状态码。默认为
200。 - 一个整数,表示响应的 HTTP 状态。示例:
200,404。
- 响应的 HTTP 状态码。默认为
-
headers
- 响应的头信息。dict 值可以是字符串(对于单值响应头)或列表(对于多值响应头)。
- 包含响应标头的类似字典的对象。可以使用
get()返回具有指定名称的第一个标头值或getlist()返回具有指定名称的所有标头值来访问值。例如,此调用将为您提供标头中的所有 cookie:1
response.headers.getlist('Set-Cookie')
-
body
- 响应正文。要将解码后的文本作为字符串访问,请使用
response.text。 - 响应正文为字节。
- 如果您希望正文作为字符串,请使用
TextResponse.text(仅在TextResponse和子类中可用)。 - 该属性是只读的。要更改响应的正文,请使用
replace()。
- 响应正文。要将解码后的文本作为字符串访问,请使用
-
text
- 将解码后的文本作为字符串访问。
- 与
response.body.decode(response.encoding)相同,但在第一次调用后缓存结果,因此您可以多次访问response.text而无需额外开销。
-
flags
- 是一个包含
Response.flags属性初始值的列表 。如果给定,列表将被浅复制。 - 包含此响应标志的列表。标志是用于标记响应的标签。例如:
'cached'、'redirected'等。它们被显示在Response (__str__方法)的字符串表示法中,该方法被引擎用于日志记录。
- 是一个包含
-
request
Response.request属性的初始值。这表示Request生成此响应的 。Request生成此响应的对象。在响应和请求通过所有下载器中间件之后,在 Scrapy 引擎中分配此属性。特别是,这意味着:- HTTP 重定向将导致原始请求(重定向前的 URL)被分配给重定向的响应(重定向后的最终 URL)。
Response.request.url并不总是等于Response.url- 此属性仅在爬虫代码和 Spider Middlewares 中 可用 ,但在 Downloader Middlewares (尽管您可以通过其他方式获得请求)和
response_downloaded信号处理程序中不可用。
-
certificate
- 2.0.0 版中的新功能。
- 代表服务器 SSL 证书的对象。
- 一个
twisted.internet.ssl.Certificate代表服务器的SSL证书的对象。 - 仅填充
https响应,None否则。
-
ip_address
- 2.1.0 版中的新功能。
- 产生响应的服务器的 IP 地址(IPv4或IPv6)。
- 此属性目前仅由 HTTP 1.1 下载处理程序填充,即用于
http(s)响应。对于其他处理程序,ip_address始终为None。
-
protocol
- 2.5.0 版中的新功能。
- 用于下载响应的协议。例如:“HTTP/1.0”、“HTTP/1.1”、“h2”
- 属性目前仅由 HTTP 下载处理程序填充,即用于
http(s)响应。对于其他处理程序,protocol始终为None。
-
-
方法
-
xpath(query)
- 根据选择器获取指定的内容
- 快捷方式
TextResponse.selector.xpath(query):1
response.xpath('//p')
- 提取出来的都是selector对象,需要进行extract()一下,然后再提取出来字符串
-
css(query)
- 根据选择器获取指定的内容
- 快捷方式
TextResponse.selector.css(query):1
2ret = response.css('#content-left > div > .author img::attr(src)')
ret = response.css('#content-left > div > .author h2::text') - 注意:
- 这种获取属性的方式只能在scrapy中使用,bs中不能这么使用
- 这种方式获取到的列表,也得extract一下,才能得到你想要的字符串
-
copy()
返回一个新的响应,它是这个响应的副本。
-
replace()
返回具有相同成员的 Response 对象,除了那些通过指定的关键字参数赋予新值的成员。
Response.meta默认情况下复制该属性。 -
urljoin(url)
-
follow()
- 返回一个
Request实例以跟随链接url。它接受与Request.__init__方法相同的参数,但url可以是相对 URL 或scrapy.link.Link对象,而不仅仅是绝对 URL。 TextResponse提供了一个follow()方法,除了支持绝对/相对 URLs 和 Link 对象外,还支持选择器。
- 返回一个
-
follow_all()
- 返回一个可迭代的
Request实例以跟踪urls中的所有链接。它接受与Request.__init__方法相同的参数,但urls的元素可以是相对 URL 或Link对象,而不仅仅是绝对 URLs。 TextResponse提供了一个follow()方法,除了支持绝对/相对 URLs 和 Link 对象外,还支持选择器。
- 返回一个可迭代的
-
json()
- 2.2 版中的新功能。
- 将 JSON 文档反序列化为 Python 对象。
- 从反序列化的 JSON 文档中返回一个 Python 对象。结果在第一次调用后被缓存。
-
Selector对象
-
简介
- 是Scrapy自己封装的一个对象,不论你上面是通过xpath还是css,获取到的都是这个对象
-
方法
-
xpath(query, namespaces=None, **kwargs)- 查找与 xpath
query匹配的节点,并将结果作为一个包含所有元素的SelectorList返回 。列表元素也实现了Selector接口。 query是一个包含要应用的 XPATH 查询的字符串。namespaces是一个可选的prefix: namespace-uri映射 (dict),用于附加前缀到register_namespace(prefix, uri)与register_namespace()相反,这些前缀不会被保存以备将来调用。- 任何额外的命名参数都可用于在 XPath 表达式中传递 XPath 变量的值,例如:
1
response.xpath('//a[href=$url]', url="http://www.example.com")
- 查找与 xpath
-
css(query)- 应用给定的 CSS 选择器并返回一个
SelectorList实例。 query是一个包含要应用的 CSS 选择器的字符串。- 在后台,使用 cssselect 库和 run
.xpath()方法将 CSS 查询转换为 XPath 查询 。
- 应用给定的 CSS 选择器并返回一个
-
re(regex, replace_entities=True)- 应用给定的正则表达式并返回具有匹配项的 unicode 字符串列表。
regex可以是一个已编译的正则表达式,也可以是一个将使用re.compile(regex)编译为正则表达式的字符串。- 默认情况下,字符实体引用替换为其对应的字符(除了
&和<)。将replace_entities设置为False关闭这些替换。
-
re_first(regex, default=None, replace_entities=True)- 应用给定的正则表达式并返回匹配的第一个 unicode 字符串。如果没有匹配项,则返回默认值(如果未提供参数则返回
None)。 - 默认情况下,字符实体引用替换为其对应的字符(除了
&和<)。将replace_entities设置为False关闭这些替换。
- 应用给定的正则表达式并返回匹配的第一个 unicode 字符串。如果没有匹配项,则返回默认值(如果未提供参数则返回
-
get()- 在单个 unicode 字符串中序列化并返回匹配的节点。百分比编码内容不加引号。
- 另见:extract() 和extract_first()
-
getall()- 序列化并返回 unicode 字符串的 1 元素列表中的匹配节点。
- 这个方法被添加到 Selector 中以保持一致性;SelectorList 更有用。另见:extract() 和extract_first()
-
extract() and extract_first()- 如果您是 Scrapy 的长期用户,您可能熟悉
.extract()和.extract_first()选择器方法。许多博客文章和教程也在使用它们。Scrapy 仍然支持这些方法,没有计划弃用它们。 - 但是,Scrapy 使用文档现在是使用
.get()和.getall()方法编写的。我们觉得这些新方法会产生更简洁和可读的代码。 - 主要区别在于
.get()和.getall()方法的输出更具可预测性:.get()始终返回单个结果,.getall()始终返回所有提取结果的列表。使用.extract()方法,结果是否是列表并不总是显而易见的;要获得单个结果,应该调用.extract()或者.extract_first()。
- 如果您是 Scrapy 的长期用户,您可能熟悉
-
Item对象
-
简介
-
示例
1
2
3
4
5
6
7
8
9
10
11
12
13class Person(scrapy.Item):
name = scrapy.Field()
age = scrapy.Field()
# 创建对象
p = Person()
# 赋值
p['name'] = 'goudan'
p['age'] = 20
# 使用
p['name'] p['age']
# 转化为字典
d = dict(p)
yield item和请求
-
yield 是什么意思?
函数中出现yield,代表这个函数是一个生成器,函数中可以出现多个yield
1
2
3
4
5
6
7
8
9
10
11
12
13
14
15
16
17
18
19
20
21
22
23
24
25
26
27
28
29
30
31
32
33def test():
lt = []
for x in range(1, 1001):
lt.append(x)
return lt
# 生成器,不是保存的数据,而是保存的这个数据生成的方式,用到的时候,直接调用,再给你生成
def demo():
for x in range(1, 11):
yield x # 当调用第一个next时,执行到此出停止,返回1
print('嘿嘿嘿') # 当调用第二个next时才执行该行,然后继续循环返回2
yield '哈哈哈'
yield '嘻嘻嘻'
a = demo()
# print(a) # <generator object demo at 0x000002BEB83BB970>
# for x in a:
# print(x)
print(next(a))
print(next(a))
# print(next(a))
# print(next(a))
# print(next(a))
# print(next(a))
# print(next(a))
# print(next(a))
# print(next(a))
# print(next(a)) -
通过
scrapy来爬取糗事百科-
items.py1
2
3
4
5
6
7
8
9
10
11
12
13
14
15
16
17
18
19
20
21
22
23# Define here the models for your scraped items
#
# See documentation in:
# https://docs.scrapy.org/en/latest/topics/items.html
import scrapy
class TextItem(scrapy.Item):
# define the fields for your item here like:
# 用户头像
face = scrapy.Field()
# 用户名
name = scrapy.Field()
# 用户年龄
age = scrapy.Field()
# 段子内容
content = scrapy.Field()
# 好笑个数
funny = scrapy.Field()
# 评论个数
comment = scrapy.Field() -
qiubai.py1
2
3
4
5
6
7
8
9
10
11
12
13
14
15
16
17
18
19
20
21
22
23
24
25
26
27
28
29
30
31
32
33
34
35
36
37
38
39
40
41
42
43
44
45
46
47
48
49
50
51
52
53
54
55
56
57
58
59
60
61
62
63
64
65
66
67
68
69
70
71
72# 使用scrapy爬取糗事百科中的段子
# https://www.qiushibaike.com/text/
import scrapy
# 导入指定的数据结构
from ..items import TextItem
class QiubaiSpider(scrapy.Spider):
name = 'qiubai'
allowed_domains = ['www.qiushibaike.com']
start_urls = ['https://www.qiushibaike.com/text/']
# 爬取多页
url = 'https://www.qiushibaike.com/text/page/{}/'
page = 1
def parse(self, response):
# 创建对象
item = TextItem()
# 首先查找所有的div
div_list = response.xpath('//div[contains(@id, "qiushi_tag")]')
# 遍历div_list
for odiv in div_list:
print('*' * 60)
# 用户头像
face = 'https:' + odiv.xpath('./div[1]/a[1]/img/@src').get()
print(face)
# 用户名
name = odiv.xpath('./div[1]/a[1]/img/@alt').get()
print(name)
# 用户年龄
age = odiv.xpath('./div[1]/div/text()').get()
print(age)
# 段子内容
content = odiv.xpath('./a/div/span')[0].xpath('string(.)').get().strip('\n\t ')
print(content)
# 好笑个数
funny = odiv.xpath('./div[2]/span[1]/i/text()').get()
print(funny)
# 评论个数
comment = odiv.xpath('./div[2]/span[2]/a/i/text()').get()
print(comment)
# 将获取的属性放到对象中
item['face'] = face
item['name'] = name
item['age'] = age
item['content'] = content
item['funny'] = funny
item['comment'] = comment
yield item
print('*' * 60)
# 接着发送请求,爬取下一页
if self.page <= 5:
self.page += 1
url = self.url.format(self.page)
print(url)
# 向拼接后的URL发送请求
yield scrapy.Request(url, callback=self.parse)
# 不能这么做,应该用我们的数据结构
# item = {
# '用户头像': face,
# '用户名称': name,
# '用户年龄': age,
# '用户内容': content,
# '好笑个数': funny,
# '评论个数': comment
# }
# print(item) -
pipelines.py1
2
3
4
5
6
7
8
9
10
11
12
13
14
15
16
17
18
19
20
21
22
23
24
25
26# Define your item pipelines here
#
# Don't forget to add your pipeline to the ITEM_PIPELINES setting
# See: https://docs.scrapy.org/en/latest/topics/item-pipeline.html
# useful for handling different item types with a single interface
from itemadapter import ItemAdapter
import json
class TextPipeline:
# 重写这个方法,当爬虫开启的时候就会调用这个方法
def open_spider(self, spider):
self.fp = open('qiubai.txt', 'w', encoding='utf8')
# 处理item数据的方法
def process_item(self, item, spider):
# 将item保存到文件中
self.fp.write(json.dumps(dict(item), ensure_ascii=False) + '\n')
return item
# 当爬虫结束时候调用这个方法
def close_spider(self, spider):
self.fp.close() -
取消遵守robots协议,添加USER_AGENT(settings.py中)
1
2
3
4
5# Crawl responsibly by identifying yourself (and your website) on the user-agent
USER_AGENT = 'Mozilla/5.0 (Windows NT 10.0; Win64; x64) AppleWebKit/537.36 (KHTML, like Gecko) Chrome/89.0.4389.72 Safari/537.36'
# Obey robots.txt rules
ROBOTSTXT_OBEY = False -
需要在
settings.py中开启管道1
2
3
4ITEM_PIPELINES = {
# 使用哪一个管道,后面的数字是优先级
'doublekill.pipelines.DoublekillPipeline': 300,
}后边数字为优先级,范围1-1000,数字越小,优先级越高。
-
设置延迟爬取:修改
settings.py文件1
DOWNLOAD_DELAY = 3
-
下载图片
-
校花网:无防盗链
items.py1
2
3
4
5
6
7
8
9
10
11
12
13
14
15# Define here the models for your scraped items
#
# See documentation in:
# https://docs.scrapy.org/en/latest/topics/items.html
import scrapy
class XiaohuaItem(scrapy.Item):
# define the fields for your item here like:
# 图片标题
title = scrapy.Field()
# 图片链接
img_url = scrapy.Field()hua.py1
2
3
4
5
6
7
8
9
10
11
12
13
14
15
16
17
18
19
20
21
22
23
24
25
26
27
28
29
30
31
32
33
34
35
36# 使用Scrapy爬取校花网中的大学校花(前50页)
# http://www.521609.com/daxuexiaohua/
import scrapy
from ..items import XiaohuaItem
class HuaSpider(scrapy.Spider):
name = 'hua'
allowed_domains = ['www.521609.com']
start_urls = ['http://www.521609.com/daxuexiaohua/']
# 爬取多页
url = 'http://www.521609.com/daxuexiaohua/list3{}.html'
page = 1
def parse(self, response):
# 创建item对象
item = XiaohuaItem()
# 获取所有的li标签
li_list = response.xpath('//div[@class="index_img list_center"]/ul/li')
# 遍历li_list
for oli in li_list:
print('*' * 60)
# 图片标题
item['title'] = oli.xpath('./a[1]/img/@alt').get().strip()
# 图片链接
item['img_url'] = 'http://www.521609.com' + oli.xpath('./a[1]/img/@src').get()
yield item
print('*' * 60)
if self.page <= 49:
self.page += 1
url = self.url.format(self.page)
yield scrapy.Request(url, callback=self.parse)pipelines.py1
2
3
4
5
6
7
8
9
10
11
12
13
14
15
16
17
18
19
20
21
22
23
24
25
26
27
28
29
30
31
32
33
34
35
36
37# Define your item pipelines here
#
# Don't forget to add your pipeline to the ITEM_PIPELINES setting
# See: https://docs.scrapy.org/en/latest/topics/item-pipeline.html
# useful for handling different item types with a single interface
from itemadapter import ItemAdapter
import json
import os
import urllib.request
class XiaohuaPipeline:
def __init__(self):
self.fp = open('hua.txt', 'w', encoding='utf8')
def process_item(self, item, spider):
# 下载图片
self.download_image(item)
obj = dict(item)
string = json.dumps(obj, ensure_ascii=False)
self.fp.write(string + '\n')
return item
def download_image(self, item):
# 指定下载路径
dirpath = 'hua'
if not os.path.exists('hua'):
os.mkdir('hua')
file_name = item['title'] + '.jpg'
filepath = os.path.join(dirpath, file_name)
urllib.request.urlretrieve(item['img_url'], filepath)
def close_spider(self, spider):
self.fp.close()
-
趣图网:有防盗链
-
items.py1
2
3
4
5
6
7
8
9
10
11
12
13
14# -*- coding: utf-8 -*-
# Define here the models for your scraped items
#
# See documentation in:
# http://doc.scrapy.org/en/latest/topics/items.html
import scrapy
class QutuprojectItem(scrapy.Item):
# define the fields for your item here like:
name = scrapy.Field()
image_url = scrapy.Field() -
qu.py1
2
3
4
5
6
7
8
9
10
11
12
13
14
15
16
17
18
19
20
21
22
23
24
25
26
27
28
29
30
31
32
33
34
35
36
37
38
39
40
41
42
43
44# -*- coding: utf-8 -*-
import scrapy
from qutuproject.items import QutuprojectItem
import os
class QuSpider(scrapy.Spider):
name = 'qu'
allowed_domains = ['www.gushiking.com']
start_urls = ['http://www.gushiking.com/gaoxiao/index.htm']
url = 'http://www.gushiking.com/gaoxiao/index_p{}.htm'
page = 1
def parse(self, response):
# 先找到所有的div
div_list = response.xpath('//div[@id="container"]/div[@class="left"]/div')[:-1]
for odiv in div_list:
item = QutuprojectItem()
# 图片标题
item['name'] = odiv.xpath('./div[@class="pic"]//img/@alt').extract_first()
# 图片链接
item['image_url'] = odiv.xpath('./div[@class="pic"]//img/@src').extract_first()
yield item
yield scrapy.Request(url=item['image_url'], callback=self.download)
if self.page <= 5:
self.page += 1
url = self.url.format(self.page)
yield scrapy.Request(url, callback=self.parse)
# 下载图片的函数,referer会自动添加
def download(self, response):
dirpath = r'C:\Users\ZBLi\Desktop\1801\day09\qutu'
# 获取请求的url
image_url = response.url
# 获取图片的名字
image_name = os.path.basename(image_url)
# 获取图片的路径
image_path = os.path.join(dirpath, image_name)
# 下载图片
with open(image_path, 'wb') as fp:
fp.write(response.body) -
pipelines.py1
2
3
4
5
6
7
8
9
10
11
12# -*- coding: utf-8 -*-
# Define your item pipelines here
#
# Don't forget to add your pipeline to the ITEM_PIPELINES setting
# See: http://doc.scrapy.org/en/latest/topics/item-pipeline.html
class QutuprojectPipeline(object):
def process_item(self, item, spider):
return item
-
1 | CRITICAL: 严重错误 |
发送post请求
- 直接发送post请求,需要将
start_urls注释掉,然后重写start_requests方法,在这个方法里面直接发送post请求 - 示例:
1
2
3
4
5
6
7
8
9
10
11
12
13
14
15
16
17
18
19
20
21
22
23# -*- coding: utf-8 -*-
import scrapy
class PostSpider(scrapy.Spider):
name = 'post'
allowed_domains = ['fanyi.baidu.com']
# start_urls = ['http://fanyi.baidu.com/']
def start_requests(self):
post_url = 'http://fanyi.baidu.com/sug'
# 表单数据
formdata = {
'kw': 'wolf',
}
# 发送请求
yield scrapy.FormRequest(url=post_url, formdata=formdata, callback=self.parse)
def parse(self, response):
print('*' * 50)
print(response.text)
print('*' * 50)
- 提取的数据不在同一个页面
- 示例:
-
items.py1
2
3
4
5
6
7
8
9
10
11
12
13
14
15
16
17
18
19
20
21
22
23
24
25
26
27
28
29
30
31
32
33# -*- coding: utf-8 -*-
# Define here the models for your scraped items
#
# See documentation in:
# http://doc.scrapy.org/en/latest/topics/items.html
import scrapy
class MovieprojectItem(scrapy.Item):
# define the fields for your item here like:
# 电影海报
post = scrapy.Field()
# 电影名字
name = scrapy.Field()
# 豆瓣评分
score = scrapy.Field()
# 电影类型
_type = scrapy.Field()
# 导演
director = scrapy.Field()
# 编剧
editor = scrapy.Field()
# 主演
actor = scrapy.Field()
# 片长
long_time = scrapy.Field()
# 介绍
introduce = scrapy.Field()
# 下载链接
# download_url = scrapy.Field() -
movie.py1
2
3
4
5
6
7
8
9
10
11
12
13
14
15
16
17
18
19
20
21
22
23
24
25
26
27
28
29
30
31
32
33
34
35
36
37
38
39
40
41
42
43
44
45
46
47
48
49
50
51
52# -*- coding: utf-8 -*-
import scrapy
from movieproject.items import MovieprojectItem
class MovieSpider(scrapy.Spider):
name = 'movie'
allowed_domains = ['www.id97.com']
start_urls = ['http://www.id97.com/movie/']
url = 'http://www.id97.com/movie/?page={}'
page = 1
def parse(self, response):
# 首先找到所有的div
div_list = response.xpath('//div[contains(@class,"col-xs-1-5")]')
# 遍历div,依次获取每一个信息
for odiv in div_list:
# 创建一个item
item = MovieprojectItem()
item['post'] = odiv.xpath('.//img/@data-original').extract_first()
item['name'] = odiv.xpath('.//img/@alt').extract_first()
item['score'] = odiv.xpath('.//h1/em/text()').extract_first().strip(' -')
# 获取类型
item['_type'] = odiv.xpath('.//div[@class="otherinfo"]').xpath('string(.)').extract_first()
# 获取详情页面链接
detail_url = odiv.xpath('.//h1/a/@href').extract_first()
# 向详情页发送请求, 并且通过meta将item传递过去
yield scrapy.Request(url=detail_url, callback=self.parse_detail, meta={'item': item})
# 获取其它页面的代码自己添加一下
def parse_detail(self, response):
# 通过response的meta属性,获取到参数item
item = response.meta['item']
item['director'] = response.xpath('//div[@class="col-xs-8"]/table/tbody/tr[1]/td[2]/a/text()').extract_first()
item['editor'] = response.xpath('//div[@class="col-xs-8"]/table/tbody/tr[2]/td[2]/a/text()').extract_first()
# '张静初 / 龙品旭 / 黎兆丰 / 王同辉 / 张国强 / 叶婉娴 / 丽娜 / 吴海燕 / 吴若林 / 喻引娣 显示全部'
item['actor'] = response.xpath('//div[@class="col-xs-8"]/table/tbody/tr[3]/td[2]').xpath(
'string(.)').extract_first().replace(' ', '').replace('显示全部', '')
# 片长
lala = response.xpath('//div[@class="col-xs-8"]/table/tbody/tr[8]/td[2]/text()').extract_first()
if lala and ('分钟' in lala):
item['long_time'] = lala
else:
item['long_time'] = ''
# 电影介绍
item['introduce'] = response.xpath('//div[@class="col-xs-12 movie-introduce"]').xpath(
'string(.)').extract_first().replace('\u3000', '').replace('展开全部', '')
# 电影链接
# item['download_url'] = response.xpath('')
yield item将其他数据传递给回调函数:
Request.cb_kwargs是在1.7版中引入的。在那之前,推荐使用Request.meta用于传递回调信息。1.7版之后Request.cb_kwargs成为处理用户信息的首选方式,留下Request.meta用于与中间件和扩展等组件通信。 -
pipelines.py1
2
3
4
5
6
7
8
9
10
11
12
13
14
15
16
17
18
19
20
21# -*- coding: utf-8 -*-
# Define your item pipelines here
#
# Don't forget to add your pipeline to the ITEM_PIPELINES setting
# See: http://doc.scrapy.org/en/latest/topics/item-pipeline.html
import json
class MovieprojectPipeline(object):
def open_spider(self, spider):
self.fp = open('movie.txt', 'w', encoding='utf8')
def process_item(self, item, spider):
obj = dict(item)
string = json.dumps(obj, ensure_ascii=False)
self.fp.write(string + '\n')
return item
def close_spider(self, spider):
self.fp.close()
-
-
process_item(self, item, spider)- 每个项目管道组件都会调用此方法。
- item是一个item对象,请参见支持所有项类型。
process_item()必须返回一个item对象,返回Deferred或引发DropItem异常。- 被丢弃的项目不再由进一步的管道组件处理。
- 参数:
- item (item object) - 抓取的项目
- spider (
Spiderobject) - 抓取物品的爬虫
- 参数:
-
open_spider(self, spider)- 这个方法在爬虫打开时被调用。
- 参数: spider (
Spiderobject) - 打开的爬虫
-
close_spider(self, spider)- 这个方法在爬虫关闭时被调用。
- 参数: spider (
Spiderobject) - 关闭的爬虫
-
from_crawler(cls, crawler) -
示例
-
1
2
3# 数据库的配置参数
DB_HOST = '10.22.2.3'
DB_PORT = 27017 -
1
2
3
4
5
6
7
8
9
10
11
12
13
14
15
16
17
18
19
20
21
22
23
24
25
26
27
28
29
30
31
32import pymongo
from itemadapter import ItemAdapter
class CityPipeline:
def __init__(self, host, port):
"""
数据库配置
:param host: 主机
:param port: 端口
"""
self.host = host
self.port = port
def from_crawler(cls, crawler):
return cls(
host=crawler.settings.get('DB_HOST'),
port=crawler.settings.get('DB_PORT')
)
def open_spider(self, spider):
self.client = pymongo.MongoClient(host=self.host, port=self.port)
db = self.client.gongkaoleida
self.collection = db.city
def process_item(self, item, spider):
self.collection.insert(item)
return item
def close_spider(self, spider):
self.client.close()
-
-
CrawlSpider是什么?- 也是一个Spider,是Spider的一个子类,所以其功能要比Spider要强大
- 多的一个功能是:提取链接的功能,根据一定的规则,提取指定的链接
-
链接提取器
1
2
3
4
5
6
7
8LinkExtractor(
allow=xxx, # 正则表达式,提取符合正则表达式的链接(*)
deny=xxx, # 正则表达式,排除符合正则表达式的链接
restrict_xpaths=xxx, # XPath路径, 提取符合XPath路径的链接(*)
restrict_css=xxx, # CSS选择器, 提取符合CSS选择器的链接(*)
allow_domains=xxx, # 允许的域名,提取在该域名下的所有链接
deny_domains=xxx, # 不允许的域名,不提取在该域名下的链接
)*表示常用
-
用法演示
-
导入
1
2scrapy shell http://www.id97.com/movie/
from scrapy.linkextractors import LinkExtractor -
通过正则提取链接
1
2
3
4# 将所有包含这个正则表达式的href全部获取到
links = LinkExtractor(allow=r'/movie/\?page=\d')
# 进行查看提取到的链接
links.extract_links(response)【注】会自动将重复的url去除掉
-
通过XPath提取
1
links = LinkExtractor(restrict_xpaths='//ul[@class="pagination pagination-sm"]/li/a')
-
通过CSS提取
1
links = LinkExtractor(restrict_css='.pagination > li > a')
-
-
使用:
follow=True1
2
3
4第一页: 23456 366
第二页:1 34567 366
第三页:12 45678 366
调度器有去重的功能,只要包含了1-366,就可以爬取所有页面follow表示是否根跟进,值为True表示跟进,也就是在爬取完第一页后爬取第二页及后续几页时接着使用LinkExtractor里提供的提取规则接着提取链接;值为False表示不跟进,也就是说LinkExtractor只在爬取第一页的时候使用一次,后续页面的爬取将不再使用LinkExtractor里提供的提取规则提取链接。
-
示例:
scrapy genspider -t crawl mm www.id97.com1
2
3
4
5
6
7
8
9
10
11
12
13
14
15
16
17
18
19
20
21
22
23
24
25
26
27
28
29
30
31
32
33# -*- coding: utf-8 -*-
import scrapy
from scrapy.linkextractors import LinkExtractor
from scrapy.spiders import CrawlSpider, Rule
from movieproject.items import MovieprojectItem
class MmSpider(CrawlSpider):
name = 'mm'
allowed_domains = ['www.id97.com']
start_urls = ['http://www.id97.com/movie/']
# 根据规则提取所有的页码链接
page_link = LinkExtractor(allow=r'/movie/\?page=\d')
# follow : 是否跟进
rules = (
Rule(page_link, callback='parse_item', follow=False),
)
def parse_item(self, response):
# 首先找到所有的div
div_list = response.xpath('//div[contains(@class,"col-xs-1-5")]')
# 遍历div,依次获取每一个信息
for odiv in div_list:
# 创建一个item
item = MovieprojectItem()
item['post'] = odiv.xpath('.//img/@data-original').extract_first()
item['name'] = odiv.xpath('.//img/@alt').extract_first()
item['score'] = odiv.xpath('.//h1/em/text()').extract_first().strip(' -')
# 获取类型
item['_type'] = odiv.xpath('.//div[@class="otherinfo"]').xpath('string(.)').extract_first()
yield item
使用代理
-
下载中间件: 在
middlewares.py中重写process_request()方法1
2
3
4
5
6
7
8
9
10
11
12
13
14
15
16
17
18
19
20
21
22
23
24
25
26
27
28
29
30
31
32
33
34
35
36
37
38
39
40
41
42
43
44
45
46
47
48
49
50
51
52
53
54
55
56
57
58
59
60
61
62
63
64
65
66# -*- coding: utf-8 -*-
# Define here the models for your spider middleware
#
# See documentation in:
# http://doc.scrapy.org/en/latest/topics/spider-middleware.html
from scrapy import signals
# 使用代理
class MyDaiLi(object):
"""docstring for MyDaiLi"""
# 重写这个方法
def process_request(self, request, spider):
request.meta['proxy'] = 'http://120.76.231.27:3128'
class DailiLoginprojectSpiderMiddleware(object):
# Not all methods need to be defined. If a method is not defined,
# scrapy acts as if the spider middleware does not modify the
# passed objects.
def from_crawler(cls, crawler):
# This method is used by Scrapy to create your spiders.
s = cls()
crawler.signals.connect(s.spider_opened, signal=signals.spider_opened)
return s
def process_spider_input(self, response, spider):
# Called for each response that goes through the spider
# middleware and into the spider.
# Should return None or raise an exception.
return None
def process_spider_output(self, response, result, spider):
# Called with the results returned from the Spider, after
# it has processed the response.
# Must return an iterable of Request, dict or Item objects.
for i in result:
yield i
def process_spider_exception(self, response, exception, spider):
# Called when a spider or process_spider_input() method
# (from other spider middleware) raises an exception.
# Should return either None or an iterable of Response, dict
# or Item objects.
pass
def process_start_requests(self, start_requests, spider):
# Called with the start requests of the spider, and works
# similarly to the process_spider_output() method, except
# that it doesn’t have a response associated.
# Must return only requests (not items).
for r in start_requests:
yield r
def spider_opened(self, spider):
spider.logger.info('Spider opened: %s' % spider.name) -
配置
settings.py1
2
3
4
5
6# Enable or disable downloader middlewares
# See http://scrapy.readthedocs.org/en/latest/topics/downloader-middleware.html
DOWNLOADER_MIDDLEWARES = {
# 'daili_loginproject.middlewares.MyCustomDownloaderMiddleware': 543,
'daili_loginproject.middlewares.MyDaiLi': 543,
} -
daili.py1
2
3
4
5
6
7
8
9
10
11
12
13
14
15# -*- coding: utf-8 -*-
import scrapy
class DailiSpider(scrapy.Spider):
name = 'daili'
allowed_domains = ['www.baidu.com']
start_urls = ['https://www.baidu.com/s?ie=UTF-8&wd=ip']
def parse(self, response):
print('*' * 50)
with open('daili.html', 'wb') as fp:
fp.write(response.body)
print('*' * 50)
模拟登录
-
豆瓣
1
2
3
4
5
6
7
8
9
10
11
12
13
14
15
16
17
18
19
20
21
22
23
24
25
26
27
28
29
30
31
32
33
34
35
36
37
38
39
40
41
42
43
44
45
46
47
48
49
50
51
52
53
54
55
56# -*- coding: utf-8 -*-
import scrapy
import urllib.request
# https://accounts.douban.com/login
class DoubanSpider(scrapy.Spider):
name = 'douban'
allowed_domains = ['www.douban.com', 'accounts.douban.com']
start_urls = ['https://accounts.douban.com/login']
def parse(self, response):
# 查找验证码图片,看有没有验证码
image = response.xpath('//img[@id="captcha_image"]/@src')
# 判断image这个列表是否为空,如果为空,就是没有验证码
if len(image) == 0:
print('不带验证码的' * 10)
# 不带验证码的
formdata = {
'source': 'index_nav',
'form_email': '1090509990@qq.com',
'form_password': 'lizhibin666',
}
else:
print('带验证码的' * 10)
# 通过属性选择器获取得到
captchaid = response.css('input[name="captcha-id"]::attr(value)').extract_first()
# 获取验证码链接
image_url = image.extract_first()
# print('*' * 50)
# print(captchaid)
# print(image_url)
# print('*' * 50)
urllib.request.urlretrieve(image_url, 'code.png')
code = input('请输入验证码:')
# 带验证码的
formdata = {
'source': 'None',
'redir': 'https://www.douban.com/',
'form_email': '1090509990@qq.com',
'form_password': 'lizhibin666',
'captcha-solution': code,
'captcha-id': captchaid,
'login': '登录',
}
post_url = 'https://accounts.douban.com/login'
# 发送post请求
yield scrapy.FormRequest(url=post_url, formdata=formdata, callback=self.lala)
def lala(self, response):
print('*' * 50)
with open('douban.html', 'wb') as fp:
fp.write(response.body)
print('*' * 50)
存储到MySQL、MongoDB
- 通过
crawlspider经常爬取这些有分页、有详情页的 - 配置
settings.py1
2
3
4
5
6
7
8
9
10
11
12
13
14
15# Configure item pipelines
# See http://scrapy.readthedocs.org/en/latest/topics/item-pipeline.html
ITEM_PIPELINES = {
'movieproject.pipelines.MovieprojectPipeline': 300,
'movieproject.pipelines.MySqlPipeline': 301,
# 'movieproject.pipelines.MyMongoDbPipeline': 301,
}
# 数据库的配置参数
DB_HOST = 'localhost'
DB_PORT = 3306
DB_USER = 'root'
DB_PASSWORD = '123456'
DB_NAME = 'movie'
DB_CHARSET = 'utf8' - 读取
settings.py文件中的参数:1
2from scrapy.utils.project import get_project_settings
settings = get_project_settings() - 自己定制配置文件中的某些选项:
mm.py1
2
3
4
5
6# 自己定制配置文件中的某些选项
custom_settings = {
"ITEM_PIPELINES": {
'movieproject.pipelines.MyMongoDbPipeline': 302,
}
} - 示例:
mm.py1
2
3
4
5
6
7
8
9
10
11
12
13
14
15
16
17
18
19
20
21
22
23
24
25
26
27
28
29
30
31
32
33
34
35
36
37
38
39
40
41
42
43
44
45
46
47
48
49
50
51
52
53
54
55
56
57
58
59
60
61
62
63
64
65
66
67
68# -*- coding: utf-8 -*-
import scrapy
from scrapy.linkextractors import LinkExtractor
from scrapy.spiders import CrawlSpider, Rule
from movieproject.items import MovieprojectItem
class MmSpider(CrawlSpider):
name = 'mm'
allowed_domains = ['www.id97.com']
start_urls = ['http://www.id97.com/movie/']
# 自己定制配置文件中的某些选项
custom_settings = {
"ITEM_PIPELINES": {
# 'movieproject.pipelines.MyMongoDbPipeline': 302,
'scrapy_redis.pipelines.RedisPipeline': 400,
}
}
# 根据规则提取所有的页码链接
page_link = LinkExtractor(allow=r'/movie/\?page=\d')
detail_link = LinkExtractor(restrict_xpaths='//div[contains(@class,"col-xs-1-5")]/div/a')
# detail_link = LinkExtractor(allow=r'/movie/\d+\.html$')
# follow : 是否跟进
rules = (
# 所有的页码不用处理,跟进即可
Rule(page_link, follow=True),
# 所有的详情页处理,不用跟进
Rule(detail_link, callback='parse_item', follow=False),
)
def parse_item(self, response):
# 创建一个item对象
item = MovieprojectItem()
# 电影海报
item['post'] = response.xpath('//a[@class="movie-post"]/img/@src').extract_first()
# 电影名字
item['name'] = response.xpath('//h1').xpath('string(.)').extract_first()
# 电影评分
item['score'] = response.xpath('//div[@class="col-xs-8"]/table/tbody/tr[last()]/td[2]').xpath(
'string(.)').extract_first()
# 电影类型
item['_type'] = response.xpath('//div[@class="col-xs-8"]/table/tbody/tr[3]/td[2]').xpath(
'string(.)').extract_first()
# 导演
item['director'] = response.xpath('//div[@class="col-xs-8"]/table/tbody/tr[1]/td[2]/a/text()').extract_first()
# 编剧
item['editor'] = response.xpath('//div[@class="col-xs-8"]/table/tbody/tr[2]/td[2]/a/text()').extract_first()
# 主演
# '张静初 / 龙品旭 / 黎兆丰 / 王同辉 / 张国强 / 叶婉娴 / 丽娜 / 吴海燕 / 吴若林 / 喻引娣 显示全部'
item['actor'] = response.xpath('//div[@class="col-xs-8"]/table/tbody/tr[3]/td[2]').xpath(
'string(.)').extract_first().replace(' ', '').replace('显示全部', '')
# 片长
lala = response.xpath('//div[@class="col-xs-8"]/table/tbody/tr[8]/td[2]/text()').extract_first()
if lala and ('分钟' in lala):
item['long_time'] = lala
else:
item['long_time'] = ''
# 电影介绍
introduce = response.xpath('//div[@class="col-xs-12 movie-introduce"]').xpath('string(.)').extract_first()
if introduce == None:
item['introduce'] = ''
else:
item['introduce'] = introduce.replace('\u3000', '').replace('展开全部', '')
# 电影链接
# item['download_url'] = response.xpath('')
yield itempipelines.py1
2
3
4
5
6
7
8
9
10
11
12
13
14
15
16
17
18
19
20
21
22
23
24
25
26
27
28
29
30
31
32
33
34
35
36
37
38
39
40
41
42
43
44
45
46
47
48
49
50
51
52
53
54
55
56
57
58
59
60
61
62
63
64
65
66
67
68
69
70
71
72
73
74
75
76
77
78
79
80
81
82
83# -*- coding: utf-8 -*-
# Define your item pipelines here
#
# Don't forget to add your pipeline to the ITEM_PIPELINES setting
# See: http://doc.scrapy.org/en/latest/topics/item-pipeline.html
import json
import pymysql
from scrapy.utils.project import get_project_settings
import pymongo
class MySqlPipeline(object):
"""docstring for MySql"""
def open_spider(self, spider):
# 连接数据库
# self.conn = pymysql.Connect(host='127.0.0.1', port=3306, user='root', password='123456', db='movie', charset='utf8')
# 将配置文件读到内存中,是一个字典
settings = get_project_settings()
host = settings['DB_HOST']
port = settings['DB_PORT']
user = settings['DB_USER']
password = settings['DB_PASSWORD']
dbname = settings['DB_NAME']
dbcharset = settings['DB_CHARSET']
self.conn = pymysql.Connect(host=host, port=port, user=user, password=password, db=dbname, charset=dbcharset)
def process_item(self, item, spider):
# 写入数据库中
sql = 'insert into movie_table(post, name, socre, type, director, editor, actor, long_time, introduce) values("%s", "%s", "%s", "%s", "%s", "%s", "%s", "%s", "%s")' % (
item['post'], item['name'], item['score'], item['_type'], item['director'], item['editor'], item['actor'],
item['long_time'], item['introduce'])
# 执行sql语句
self.cursor = self.conn.cursor()
try:
self.cursor.execute(sql)
print('#' * 10)
self.conn.commit()
except Exception as e:
print('*' * 10)
print(e)
self.conn.rollback()
return item
def close_spider(self, spider):
self.cursor.close()
self.conn.close()
class MyMongoDbPipeline(object):
def open_spider(self, spider):
# 链接数据库
self.conn = pymongo.MongoClient(host='127.0.0.1', port=27017)
# 选择数据库
# 没有这个库会自动创建
db = self.conn.movie
# 选择集合
self.collection = db.movie_col
def process_item(self, item, spider):
# 来一个item,就应该写入到mongodb中
self.collection.insert(dict(item))
def close_spider(self, spider):
self.conn.close()
class MovieprojectPipeline(object):
def open_spider(self, spider):
self.fp = open('movie.txt', 'w', encoding='utf8')
def process_item(self, item, spider):
obj = dict(item)
string = json.dumps(obj, ensure_ascii=False)
self.fp.write(string + '\n')
return item
def close_spider(self, spider):
self.fp.close()
Redis简单回顾
- 配置:
windows redis启动1
redis-server.exe redis.windows.conf
- linux redis客户端连接windows的服务器
1
redis-cli -h 10.8.153.5
- 配置windows的redis服务器可以让其它客户端连接和读写
- 第56行,把这个注释掉
1
# bind 127.0.0.1
- 第75行
1
protected-mode no
- 第56行,把这个注释掉
分布式部署
scrapy:一个框架,不能实现分布式爬取scrapy-redis:基于这个框架开发的一套组件,可以让scrapy实现分布式的爬取
-
安装
1
pip install scrapy-redis
-
样本查看
- https://github.com/rmax/scrapy-redis
- scrapy-redis\example-project\example\spiders\
1
2
3
4
5
6
7
8dmoz.py 普通crawlspider,没有参考价值
myspider_redis.py 分布式的Spider模板
mycrawler_redis.py 分布式的CrawlSpider模板
Spider ====》 RedisSpider
CrawlSpider ====》 RedisCrawlSpider
name ====》 name
redis_key ====》 start_urls
__init__() ====》 allowed_domains⚠️注意:
__init__()是一个坑,现在还是使用allowed_domains这种列表的形式
-
存储到
redis中scrapy-redis组件已经写好往redis中存放的管道,只需要使用即可,默认存储到本机的redis服务中settings.py:默认存储到本机的redis服务中1
2
3
4
5
6# 自己定制配置文件中的某些选项
custom_settings = {
"ITEM_PIPELINES": {
'scrapy_redis.pipelines.RedisPipeline': 400,
}
}- 如果想存储到其它的
redis服务中,需要在settings.py中配置1
2
3
4
5
6REDIS_HOST = 'ip地址'
REDIS_PORT = 6379
REDIS_PARAMS = {
'password' : 'xxxxxx',
'db': 2
}
-
部署分布式
- 爬虫文件按照模板文件
mycrawler_redis.py修改:nn.py1
2
3
4
5
6
7
8
9
10
11
12
13
14
15
16
17
18
19
20
21
22
23
24
25
26
27
28
29
30
31
32
33
34
35
36
37
38
39
40
41
42
43
44
45
46
47
48
49
50
51
52
53
54
55
56
57
58
59
60
61
62
63
64
65
66
67
68
69# -*- coding: utf-8 -*-
import scrapy
from scrapy.linkextractors import LinkExtractor
from scrapy.spiders import CrawlSpider, Rule
from movieproject.items import MovieprojectItem
from scrapy_redis.spiders import RedisCrawlSpider
class NnSpider(RedisCrawlSpider):
name = 'nn'
allowed_domains = ['www.id97.com']
redis_key = 'nnspider:start_urls'
# 自己定制配置文件中的某些选项
custom_settings = {
"ITEM_PIPELINES": {
# 'movieproject.pipelines.MyMongoDbPipeline': 302,
'scrapy_redis.pipelines.RedisPipeline': 400,
}
}
# 根据规则提取所有的页码链接
page_link = LinkExtractor(allow=r'/movie/\?page=\d')
detail_link = LinkExtractor(restrict_xpaths='//div[contains(@class,"col-xs-1-5")]/div/a')
# detail_link = LinkExtractor(allow=r'/movie/\d+\.html$')
# follow : 是否跟进
rules = (
# 所有的页码不用处理,跟进即可
Rule(page_link, follow=True),
# 所有的详情页处理,不用跟进
Rule(detail_link, callback='parse_item', follow=False),
)
def parse_item(self, response):
# 创建一个item对象
item = MovieprojectItem()
# 电影海报
item['post'] = response.xpath('//a[@class="movie-post"]/img/@src').extract_first()
# 电影名字
item['name'] = response.xpath('//h1').xpath('string(.)').extract_first()
# 电影评分
item['score'] = response.xpath('//div[@class="col-xs-8"]/table/tbody/tr[last()]/td[2]').xpath(
'string(.)').extract_first()
# 电影类型
item['_type'] = response.xpath('//div[@class="col-xs-8"]/table/tbody/tr[3]/td[2]').xpath(
'string(.)').extract_first()
# 导演
item['director'] = response.xpath('//div[@class="col-xs-8"]/table/tbody/tr[1]/td[2]/a/text()').extract_first()
# 编剧
item['editor'] = response.xpath('//div[@class="col-xs-8"]/table/tbody/tr[2]/td[2]/a/text()').extract_first()
# 主演
# '张静初 / 龙品旭 / 黎兆丰 / 王同辉 / 张国强 / 叶婉娴 / 丽娜 / 吴海燕 / 吴若林 / 喻引娣 显示全部'
item['actor'] = response.xpath('//div[@class="col-xs-8"]/table/tbody/tr[3]/td[2]').xpath(
'string(.)').extract_first().replace(' ', '').replace('显示全部', '')
# 片长
lala = response.xpath('//div[@class="col-xs-8"]/table/tbody/tr[8]/td[2]/text()').extract_first()
if lala and ('分钟' in lala):
item['long_time'] = lala
else:
item['long_time'] = ''
# 电影介绍
introduce = response.xpath('//div[@class="col-xs-12 movie-introduce"]').xpath('string(.)').extract_first()
if introduce == None:
item['introduce'] = ''
else:
item['introduce'] = introduce.replace('\u3000', '').replace('展开全部', '')
# 电影链接
# item['download_url'] = response.xpath('')
yield item - 配置文件中添加:
settings.py1
2
3
4
5
6# 使用scrapy-redis组件的去重队列
DUPEFILTER_CLASS = "scrapy_redis.dupefilter.RFPDupeFilter"
# 使用scrapy-redis组件自己的调度器
SCHEDULER = "scrapy_redis.scheduler.Scheduler"
# 是否允许暂停,断点爬取
SCHEDULER_PERSIST = True - 开始跑:
- 我的windows (不仅是客户端,还是redis服务端)
- 大家的windows(客户端)
- 【注】分布式爬取的时候,指令不是
scrapy crawl xx
而是:scrapy runspider xxx.py - 在我的windows中往Redis队列中添加起始url
进入Redis,输入以下命令1
lpush nnspider:start_urls "http://www.id97.com/movie/"
- 爬虫文件按照模板文件
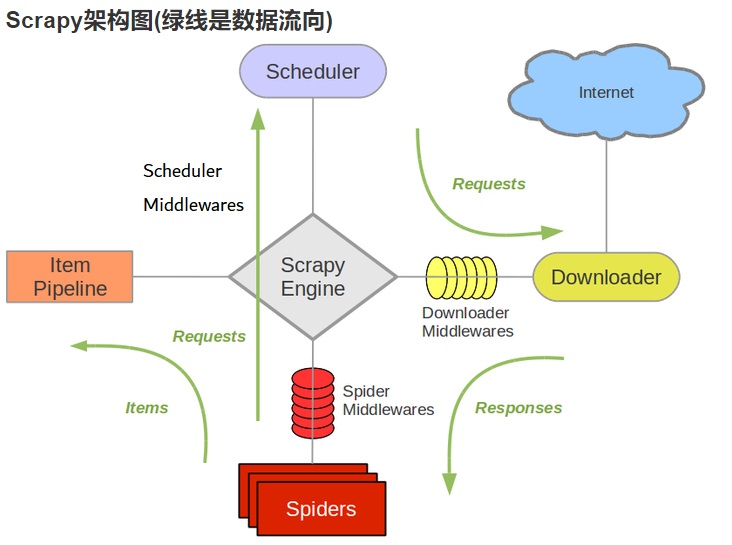
原理图